
Looking for an easy way for your customers to place orders online?
One of the best ways to do this is by placing an order form on your website.
In this article, I will be showing you step by step exactly how you can create a professional own order form in WordPress in a few simple steps!
Table of Contents
- What is an order form?
- What is the best WordPress plugin to create order forms?
- How to create a professional order form in WordPress (Step by Step guide)
- Step 1: Install WPForms
- Step 2: Build a Simple Order Form
- Step 3: Configure the Notification Settings
- Step 4: Set up the Confirmation Message for your Customer
- Step 5: Configure Your Payment Notifications
- Step 6: Add Your Order Form To Your WordPress Website
- Final Words
What is an order form?
Now before I dive into the magic of how to create your own order form in a few simple steps, let’s take a look at what they are.
In a nutshell, an order form is a form that allows you to collect orders and payments from your customers online!
This works perfectly if you run a food delivery service and you’re looking for an easy and convenient way for your customers to place their orders.
With an order form, you can either accept payments online, when the order is picked up or even on delivery.
Moreover, having an order form on your website eliminates the need to have an entire e-commerce solution on your website.
However, if you’re looking for a solid e-commerce platform check out our full in-depth review of Shopify.
Now let’s take a look at the best WordPress plugin to create an order form.
What is the best WordPress plugin to create order forms?
![]()
There are TONS of different WordPress form builders but my personal preference is WPForms.
WPForms is the best drag and drop form builder for WordPress on the market that helps beginners create forms, newsletter subscription forms, order forms, and basically any type of online form you need for your business.
Over 3 million professionals have used WPForms to build amazing forms and surveys and that number is consistently growing daily.
The best part? There is NO coding involved.
Thanks to the wide range of form templates you can build your forms in no time at all.
Once you are finished and happy with the end result of your form then you can easily embed it on your website or place it in the sidebar using widgets.
Now that you know the best WordPress plugin to create an order form let’s take a look at the step by step guide to building your own order form in a few minutes.
Related: Full in-depth WPForms Review
Click HERE To Try WPForms Risk Free For 14-Days!
How to create a professional order form in WordPress (Step by Step guide)
Let’s get straight into the goodies!
Here are the steps that you need to take in order to build a professional order form in WordPress:
Step 1: Install WPForms
Step 2: Build a Simple Order Form
Step 3: Configure the Notification Settings
Step 4: Set up the Confirmation Message for your Customers
Step 5: Configure Your Payment Notifications
Step 6: Add Your Order Form To Your WordPress Website
Now that you know the steps let’s take a more detailed look at each of these steps.
Step 1: Install WPForms
The first step is to activate WPForms on your WordPress website. If you already have WPForms then you can skip directly to Step 2.
Installing a plugin is fairly simple and straight-forward but for a more detailed article on how to install a WordPress plugin click here.
After you activate the WPForms plugin you will be directed to the WPForms tab in the sidebar of your WordPress dashboard.
Go to that tab and hit Settings and then copy and paste your license key.
Once this is done go to WPForms and then select Add New and you will be taken to the form builder.

Step 2: Build a Simple Order Form
You will see a showcase of a variety of different forms that you can choose from.
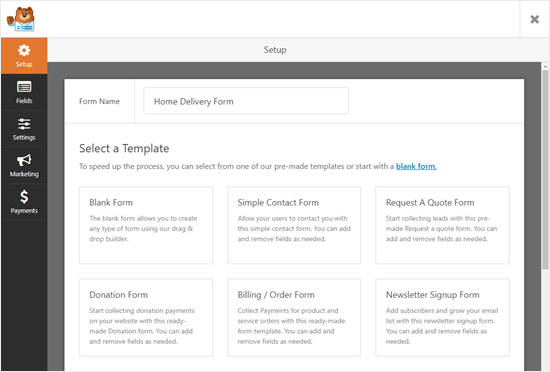
Select “Billing/Order Form”
BOOM!
Your form is now automatically created just like magic.
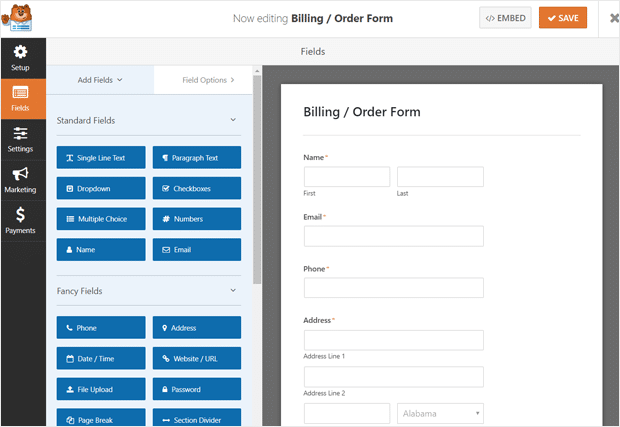
You will then see the WPForms form editor which allows you to customize your entire form by using the drag-and-drop editor.
You can customize any field by the simple click of your mouse. This gives you the full creative expression to build your order form exactly how you want it.
By default, you will be presented with fields such as phone number, name, and address. However, you need to list the products that can be ordered.
To do this click “Available Items”.
The editing options will then appear on the left-hand side of the screen. This is where you can rename the items, adjust the pricing, and add or delete items.
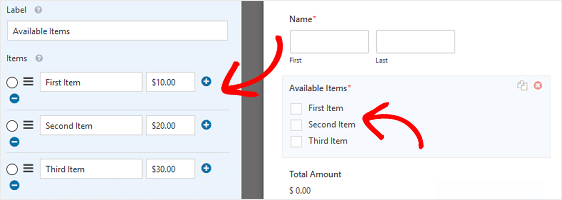
You can add as many items as you want by clicking the (+) icon. However, keep in mind that your customers can only choose one item at a time.
So if you are selling hamburgers and you offer fries as a side and you want to give your customers both of these options then you will need to use a different type of field.
To do this just click “Add Fields” then scroll to “Payment Fields” and drag and drop the “Checkbox items” to where you want it in your form.
You can also show images next to your products by checking the box “Use image choices”. You have the option to add images from your computer or the WordPress media library.

That’s it you just created your first form! Now let’s configure all of the settings.
Step 3: Configure the Notification Settings
There are a few settings that you will be configuring. The first step will be configuring the notifications your order form will send out.
This will send a notification to you every time a customer fills out a form.
To do this click Settings on the left-hand side of your screen.
Next, click the Notifications tab to change the forms of email notifications. The default setting will send notification emails to the admin of your website.

Next, add the email address that will receive a notification when a new order is submitted.
You can send notifications to anyone on your team by adding their email to Send to Email Address. Just ensure that you separate each email with a comma.
We suggest that you also send notifications to the email address of the person that submitted the form which is your customer.
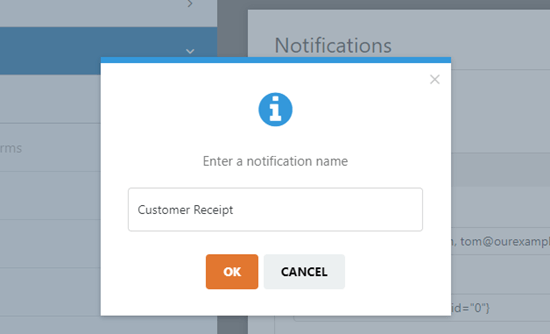
To do this click Add New Notification.

Then type in the name of the new notification. You can call it whatever you want, your customer won’t see this name.
Next, delete the {admin_email} from the Send to Email Address box and click Smart Tags and select Email.
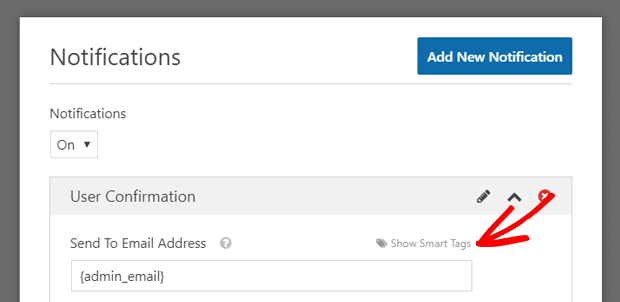
The next step is to change the subject line so that it varies for each order. You can even add a message in the Message field. You are also given the option to change any other details like the “From Name”,” From Email” and “Reply-To” emails.
After you have set up the Notifications in the best way possible for both you and your customer click Save.
Step 4: Set up the Confirmation Message for your Customer
This step allows your customers to get on-screen confirmation that their order has been sent.
To do this go to Settings then click the Confirmation tab.

There are three different confirmation types that you can choose from. These types are Message, Show page, and Go to Url (Redirect).
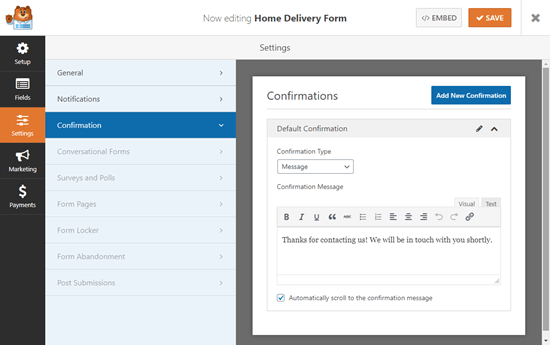
You can change the message to anything you want to. You may want to simply thank your customer for placing an order or give them a discount that they can use with future orders.
After you have completed customizing the message just click Save.
With the Go to Url (Redirect), you can redirect your customers to your website or a totally different website.
Step 5: Configure Your Payment Notifications
The last step is to configure the payment settings so you can collect online payments from your customers.
To do this click the Payments tab.

WPForm has integrations with popular payment processors like Paypal and Stripe that allows you to collect online payments.
To access these payment methods install and activate the correct addons by navigating to WPForms > Addons. Scroll to the Addon that you want to install and click the ‘Install Addon’ button.
Next, go back to your form and click on the Payments tab and configure your payment settings depending on the Payment provider you chose.
Then just click Save.
Now you are all ready to add your form to your website.
Step 6: Add Your Order Form To Your WordPress Website
Now, this is where you get to share your order form with the world.
To add your order form to your website just choose the page or post that you want to add the form to.
If you are creating a new page go to Pages and click Add New. If you are creating a new post go to Post and click Add New.
Next, click the (+) icon to add a new block then click the WPForms icon.
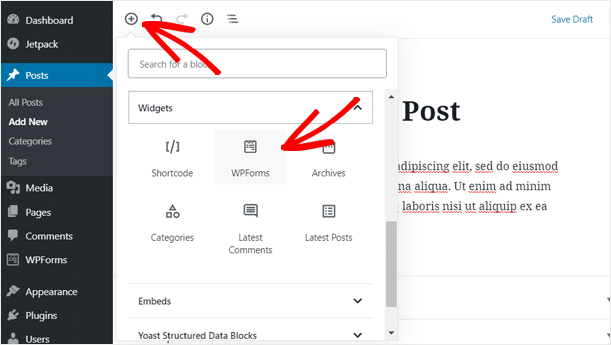
You will then see the WPForms block. Click Select a Form dropdown and choose your order form.
Next click Publish or Update depending on if you are editing a post or creating a new one.
You can also add the order form to your website’s sidebar as a widget by going to Appearance and clicking Widgets.
Then add the WPForms widget to your sidebar. Then select the Billing/Order Form from the drop-down menu and click Save.
Then you can preview your order form live on your site.
BOOM! You now have a professional order form on your website.
Click HERE To Try WPForms Risk Free For 14-Days!
Final Words
Whew. That was a lot but we hope this article helped show you how to create an online order form in WordPress using WPForms.
Running an online business? Check out our article on the 13 Best Landing Page Builders of this decade!