
WELCOME to The Online Genius, your one-stop-shop for everything relating to the online business community. Every week we publish the latest tips, tricks, and reviews on tools that will help you take your business to the next level!
Personally I absolutely HATE filling out long-forms, every time I am sent a form and it’s too long I immediately feel overwhelmed, and my chances of completing the form drop significantly.
I know tons of people that feel the exact same way.
Luckily, there’s a way to take your long-form and break it down so it’s easier for your audience to read. This is one of the best ways to immediately improve your user engagement.
It’s called a Multi-Page Form or a Multi-Step Form.
Table of Contents
- What is a Multi-Page Form?
- Why Should You Use a Multi-Page Form on Your WordPress Website?
- What is the best plugin to create Multi-Page Forms on WordPress?
- How To Set up a Multi-Page Form on your WordPress Website (Step By Step)
- 5 tips to increase the conversion rate of your multi-page forms
- Final Words
What is a Multi-Page Form?
In a nutshell, a multi-page form allows you to break up a long-form into different pages making it easier for your user to fill out.
Think of a long-form as a 12-inch pizza and the multi-page form as a slice of pizza. It’s easier to eat the slice, isn’t it? Yes. Yes, it is!
The main aim of a multi-page form is to improve your user experience which will result in higher conversions.
It’s honestly one of the best ways to send a form that has a ton of questions to your audience without boring them.
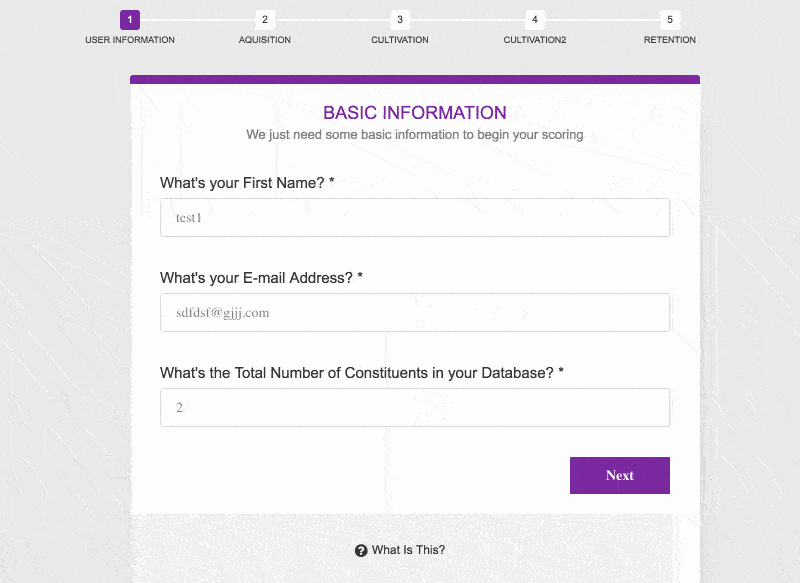
Here is an example of a multipage form.
Now aside from the fact that it increases engagement and improves the overall user experience let’s take a look at the other reasons why you should take advantage of multi-page forms.
Why Should You Use a Multi-Page Form on Your WordPress Website?
Here are four reasons why you should use a multi-page form on your website:
- It will increase your conversion rate – By simply splitting your form into different pages you will make the overall experience for your user more enjoyable. In other words, the chances of your user staying and filling out your form will drastically increase.
- The progress bar will encourage your users to finish the form – Having a progress bar gives users that added incentive to finish filling out the form.
- It’s less overwhelming – When users first open a multi-part form it’s very smooth and not overwhelming at all.
- Only get the data you want – Now this is where things get really interesting. You can use conditional fields that only show parts of the form depending on the answers that users provide.
Fun Fact: WhatIsMyComfortZone.com converted an additional 53% of site visitors into leads, despite asking a lot of questions thanks to the multi-step form. (Venture Harbour)
Quick Tip: I would definitely recommend using a multi-page form if you have more than 3 form fields !! This allows for a smoother look and a higher conversion rate.
What is the best plugin to create Multi-Page Forms on WordPress?
![]()
There are tons of different plugins that you can choose from when it comes to creating your own multi-page form for your website.
However, in my opinion, the best plugin that you can use to create Multi-page forms is WPForms.
WPForms makes the entire process as smooth as butter! That means you will have your own multi-page form up and running in no time at all!
If you want to read more information about WPForms I would suggest that you read our in-depth review where we tear the contact form plugin down to its bare bones and bring you the truth on if it is really worth it or not.
Now that you know the best plugin to build a multi-page form let’s take a look at the step by step guide on how you can create your own multi-page form in a few minutes!
Click HERE To Try WPForms Risk Free For 14-Days!
How To Set up a Multi-Page Form on your WordPress Website (Step By Step)
Let’s take a look at how you can set up a multi-page form using WPForms on your WordPress website step by step!
- Create a Form in WordPress
- Separate Your Form using page-breaks
- Choose the type of progress bar you want to use
- Setup your form settings
- Setup your form notifications
- Setup your form confirmations
- Add your form to your website
Now that you have a birds-eye view of how to set up a Multi-Page Form on your WordPress website using WPForms.
Step 1: Create a form in WordPress
Before we even continue you need the WPFormsplugin. Installing it can be done in a few simple steps but if this is your first time installing a plugin check out this article on how to install a WordPress plugin.
Once you verify your license with WPForms you can then move straight to creating your first multi-page form.
Firstly go to WPForms => Add New and you will be directed to the form builder.

You will be presented with a variety of forms to choose from or you can start from scratch with a blank form. The form templates that you can choose from include:
- Simple Contact Form
- Request a Quote Form
- Survey Form
- Poll Form
- Order Form
- Job Form
- User Registration Form
Once you choose the form that best suits your needs you will be taken to the form builder.
In the form builder, you are presented with a wide range of fields that you can add to your form adding the intuitive drag and drop editor.

After adding the form fields that correspond with your objectives you can then move to the next step!
Step 2: Separate your form using page-breaks
Now the magic begins!
This is where you begin to take your overwhelming long-form and make it into bite-size pieces.
Once you are satisfied with the form fields that you have then you can split your form into different pages.
In order to do this click on the Page Break field under Fancy Fields and drag it to exactly where you want the page break to occur.
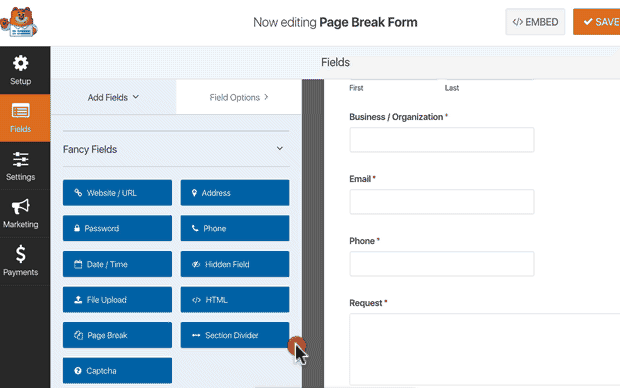
You will then see that WPForms adds a page break marker indicating that you have successfully done a page break.
Your pages will then end with a “Next” button instead of a “Submit” button.
You can then continue to repeat this process and split your form onto different pages.
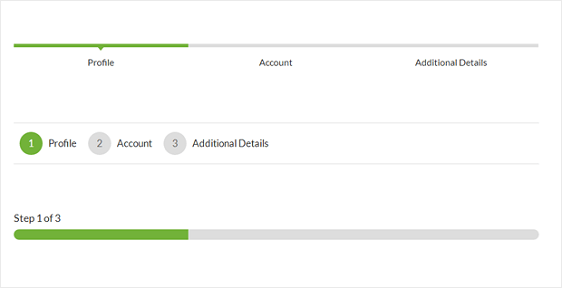
Step 3: Choose the type of progress bar that you want to use
Having a progress indicator on your form page will increase the chances of someone completing your form.
That being said WPForms gives you a variety of different progress bars that you can choose from.
You are given the option of choosing the following progress bars:
- Connectors
- Circles
- Progress Bar
There’s also the option of choosing no progress bar if you prefer not to have it on your form.
My personal favorite has to be the connectors since it not only shows my audience exactly where they are on my form but also the title of the section.
Once you choose the progress bar type that you want to go with you are then given full creative freedom.
That means you can customize the color of your indicator as well as choose the page titles if you decide to go with the Connectors or Circles option.
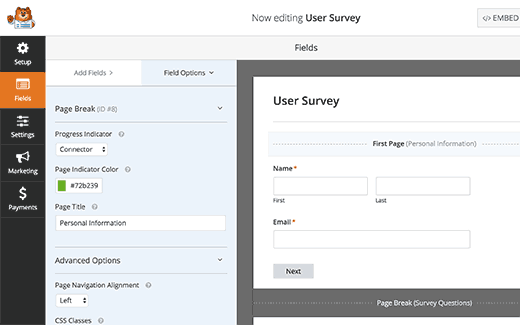
In order to edit the next page title and the button that takes your users to the next page of your form click on the Page Break marker and you can edit the page break title and the next label title.
You can even turn on a “Previous” label which allows your users to go back to previous questions.
You can then continue adding forms after the page break. If you want to take advantage of conditional logic which allows you to show users specific questions based on their previous responses then you would have to upgrade to the PRO version of WPForms.
Once you are happy with your form, click on the save button that’s in the top right-hand corner of the screen.
There you have it! You just created your own multi-page form in a few simple steps!
Now before I show you how to add this form to your WordPress website let’s configure your settings so you have an organized layout!
Step 4: Set up your form settings
In order to do this just go to Settings => General.
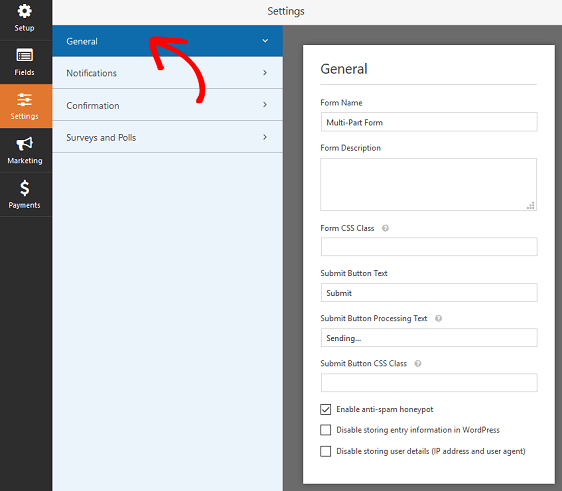
Here you can change all the details of your form such as:
- Form Name
- Form Description
- Submit Button Text
- Spam Prevention
- AJAX Forms
- GDPR Enhancements
Step 5: Set up your form notifications
Having notifications set up allows you to know exactly when someone completes and submits a form. Don’t worry if you know that you will be getting hundreds of submissions you can always disable this feature.
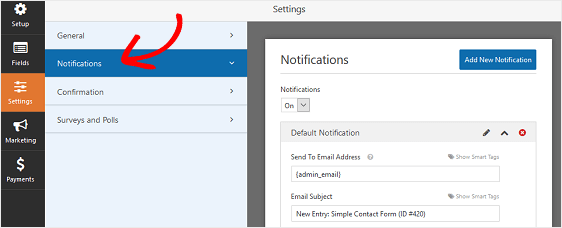
You can also go the extra mile by sending out an email notification to your user when they complete your form.
For example, you may send out a form that qualifies a business for your marketing agency and you may want a notification sent to that business letting them know that you will be in contact with them as soon as possible.
If you would like extra assistance with setting up notifications check out WPForms documentation on how to set up form notifications in WordPress.
Step 6: Set up your form confirmations
Confirmations are messages that are displayed to visitors after they fill out a form letting them know their form has been processed.
WPForms has three different confirmation form types that you can choose from. They are:
- Message – This simply allows a message to appear letting them know their form has been processed.
- Show Page – This will take your site visitors to a “Thank You” page where you can display even more information about your business.
- Go To URL – This option allows you to send the site visitors to any URL of your choice.
In order to build these confirmations follow the following sets.
Click Settings then click Confirmation.
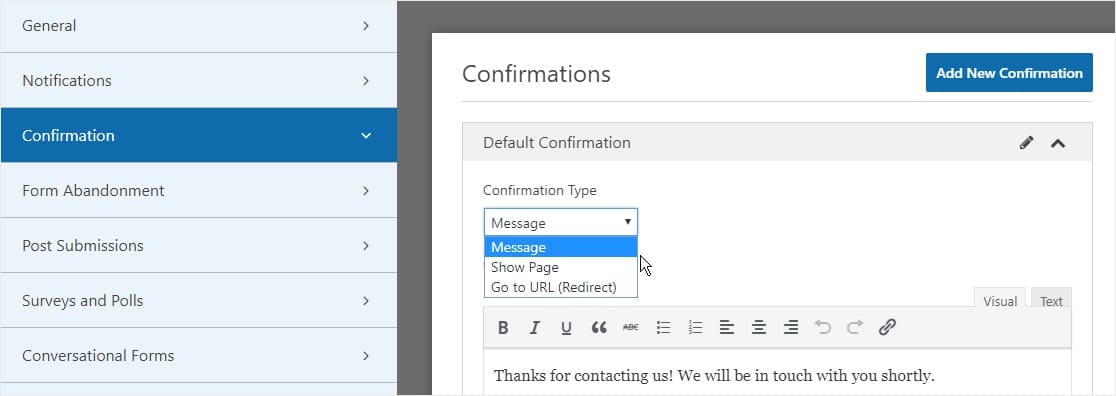
Next, select the type of confirmation type you would like to create.
Then customize the confirmation type depending on your goals and click Save.
Now you are all set to add your form to your website. Let’s take a look at exactly how you can get that done.
Step 7: Add the form to your WordPress Website
This is why I love WPForms, they make it super easy for you to add your form into your WordPress posts and pages.
We added this form through the WordPress Classic Editor.
Firstly create a new post or edit an existing one that you have.
Then click Add Form.

Click on the WPForms drop-down box and choose the multi-page form that you just created.
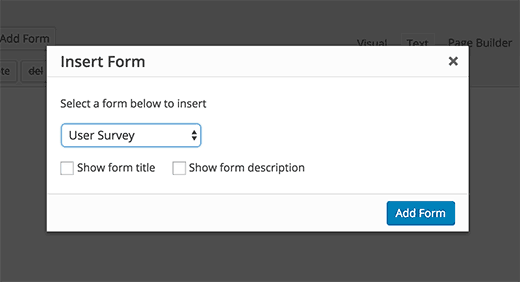
Next click Publish or Update (depending on if you are editing an existing post or adding a new one).
Your form should now be fully functional on your website. Keep reading to see our top tips on how to increase the conversion rate of your multi-page forms!
5 tips to increase the conversion rate of your multi-page forms
Now that you know exactly how to create your own multi-page form. Let’s take a look at 5 tips that will help you create amazing forms.
Tip #1: Ask sensitive questions last
When building out your multi-page form ask the sensitive questions last as the user has already committed to filling out form thus form. This decreases the chances of people opting out of your form.
Sensitive questions include asking for a user’s email address or phone number.
Tip #2: Keep the language simple
Never use words in your forms that give your audience the impression that you’re trying to persuade them to go in a specific direction.
For example, let’s say you are doing a form on the customer service at your local pizza restaurant. By using the words “best pizzeria in the city” you are implying that you have an opinion and you are not neutral
By keeping the language simple you will increase the engagement and completion rates of your forms.
Tip #3: Start off your form with “exciting” questions
Starting your form with questions that get your audience pumped is one of the best ways that you can guarantee that they finish your form.
For example, starting off your form with a question like “What is your financial goal for your business in the next 6 months” is perfect because it will get your users thinking and excited about their long-term visions.
This excitement will be more than enough to help them get through the form.
Tip #4: Take full advantage of conditional logic
What is conditional logic? Well, this allows you to only show certain questions that directly relate to the previous question.
For example, you may have the question “Do you prefer Italian food or Mexican food?”. If the respondent chooses Italian food you can build the rest of the form based on that specific choice. So the next question could be “What is your favorite Italian food?”.
Tip #5: Offer an incentive for filling out the form
This is one of the oldest and most effective tricks in the book but I’m surprised by the number of people that don’t take full advantage of it.
By offering an incentive you will encourage your users to make it to the end of the form.
After all, who wouldn’t complete a form that offered a free “all you can eat voucher” at the best restaurant in the city once you submit the form!
This will no doubt reduce your drop-off rates and boost your conversions!
Related: How to build a website step by step in an hour!!
Final Words
Boom !! YOU ARE NOW A MULTI-FORM PAGE BUILDING CHAMPION!
If you followed all of the steps correctly then you should have an amazing multi-page form.
Still, deciding if WPForm is the best contact form plugin for you? That’s okay. Check out our full review on WPForms. By the end of that article, you will know if it is right for you and your business.
Click HERE To Try WPForms Risk Free For 14-Days!