
It’s no secret that having Google Analytics on your website is incredibly important! With Google Analytics you will know exactly how many users are on your website, which URLs they are interacting with, and even how long they stay on each URL.
Now, setting up Google Analytics on your WordPress website may seem like a daunting task but trust me when I say it’s actually pretty simple.
In this article, I will be showing you how to set up Google Analytics on your WordPress website the right way!
So without further ado, let’s dive straight into the article.
Table of Contents
The Best Google Analytics Plugin
![]()
The easiest way to install Google Analytics on your WordPress website is by using a plugin and the best Google Analytics plugin is MonsterInsights.
MonsterInsights allows you to set up universal tracking across all of your devices with a few simple clicks of your mouse. MonsterInsights also shows real-time stats right inside your WordPress dashboard.
It also has a ton of other cool features like enhanced e-commerce tracking, custom dimensions, and Affiliate links & ad tracking.
The best part? There is no coding required which makes it easy for any beginner to set up Google Analytics in a few minutes.
Oh yeah! I almost forgot they have an awesome FREE version. Click here to check it out.
Related: The Best WordPress Plugins for your website!
Click HERE To Try MonsterInsights For Free!
How To Install Google Analytics Step By Step Guide
Here’s a brief overview of the steps that you will need in order to install Google Analytics correctly on your WordPress website.
Step 1: Create a Google Analytics Account
Step 2: Install the MonsterInsights Plugin
Step 3: Authenticate with your Google Account
Step 4: Select the profile you want to track
Great! Now that you know the steps that you need to take in order to get Google Analytics up and running on your website in no time let’s go into a little bit more detail into each step.
Step 1: Create a Google Analytics Account
If you already have a Google Analytics account you can skip directly to Step 2.
Firstly go to the Google Analytics website and click the Start for free button.
Next login to your Google account if you have one, if you don’t just simply go ahead and create a new Google account.
Once you are all signed in with your Google account you will be then taken to the Google Analytics sign-up page. On this page, you will be asked to present an account name, next check all of the appropriate boxes. Then click Next.
Now select the Web option.
Once that’s done enter the website’s name, website’s URL, country, and the time zone.
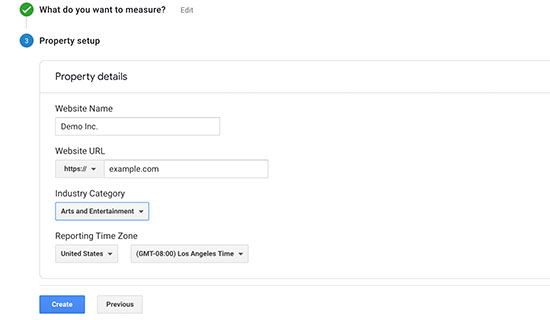
Next, click the Create button. You will then be presented with the Google Analytics Terms of Service, click on I Agree.
You will be then taken to a screen where you will be shown your Tracking ID and the tracking code.
Step 2: Install the MonsterInsights Plugin
If you already have this plugin then you can skip to Step 3. If not, follow the next few steps.
In order to install this plugin just hit the Plugin tab on your WordPress dashboard then hit Add New. Next, just type in MonsterInsights and then hit Install Now. Once that’s done click Activate Plugin.
The plugin will be called Insights on your WordPress Dashboard.
Boom! You now have the best Google Analytics plugin on the market installed on your WordPress website.
Keep reading to see how to get Google Analytics linked up to your website in a few minutes!
Step 3: Authenticate with your Google Account
Now that you have correctly installed MonsterInsights on your website we can now get straight down to business – authenticating Google Analytics with MonsterInsights.
In order to do this click on Insights and you will be directed to the setup wizard.
You will then be taken to a page that lays out the different categories for your website.

After you choose a category for your website click “Save and Continue”.
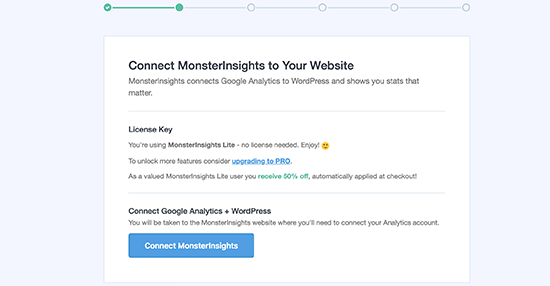
On the next screen click “Connect Monster Insights”.
If you aren’t directed to the setup wizard click Settings then click “Connect Monster Insights”.
Once you do this you will be taken to a screen that has a list of all your Google Accounts. Select the one that’s linked to your Google Analytics account. You will be then taken to a screen that asks you to allow MonsterInsights access to your Google Analytics account.
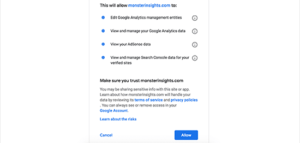
Next click “Allow” in order to allow MonsterInsights access your Google Analytics Account.
Step 4: Select the profile you want to track
The last step is to simply choose the profile that you want to track and click “Complete Connection”.
That’s it! You now have Google Analytics installed on your website. You will then be directed to a page that will show recommended settings for the Google Analytics plugin.
However, it may take at least 48 hours for your data to begin tracking on Google Analytics. Once it starts tracking you can see your data by going to Insights and selecting Dashboard.
Conclusion
Well, there you have it, ladies and gentlemen. An easy and effective way to install Google Analytics on your website.
Installing Google Analytics will probably be one of the most important parts of correctly setting up your website so if you haven’t installed it as yet I would suggest that you get to it immediately!
Related Articles: